Sunday, June 7, 2020

How to Transform a Dresser

Last week I showed my latest dresser transformation.

BEFORE
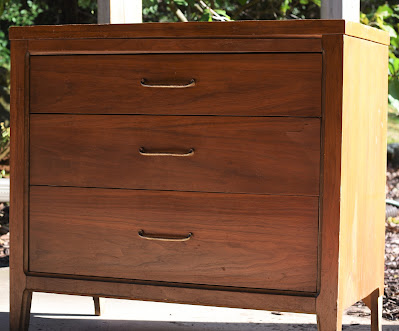
AFTER
This week is all about how I transformed this dresser
and what products I used.

This is not a sponsored posts. I wasn't compensated
for any of the products that I used. All of my
opinions are my own and unbiased. Some of the
products that I mention are ones that I have used
numerous times and some are new to me that I
was impressed with the quality and ease of use
and thought that they deserved being mentioned.

Before I start, I want to mention that I didn't
take many pictures during the transformation
process. I tend to get caught up in the moment
trying to figure things out
and forget about taking pictures. Hopefully,
you will be able to follow along anyway.

So, lets get started on this transformation.
Once I started working on this dresser I realized that the sides
were just a piece of 1/4" wood veneer 
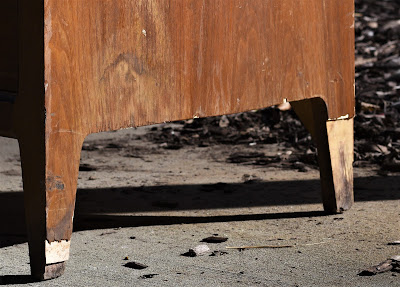
and the top piece
was pressed board with a layer of  wood veneer over it.
All of the veneer was removed from the dresser.
The sides and top piece were completely removed and
Hubby and I created new ones with
pieces of solid birch wood.
After removing the damaged veneer from the
drawer fronts I discovered a big chunk of the
wood was missing from the 2nd drawer.
Dang it!
I couldn't just sand the drawer fronts and
be done with them.
I filled in the hole with wood filler, let dry,
and sanded it smooth.
New wood veneer needed to be applied
to each drawer so that they would all
have the same wood grain finish.
I knew that I wanted to stain this dresser and not paint it.
I had to order new wood veneer for the drawer fronts.
Each drawer was sanded and cleaned and ready
to apply the new wood veneer.
When the new veneer arrived for the draw fronts
I was surprised that it came
in a box rolled up. I was expecting it to be a flat sheet.
This is the wood veneer that I used for the drawer fronts.
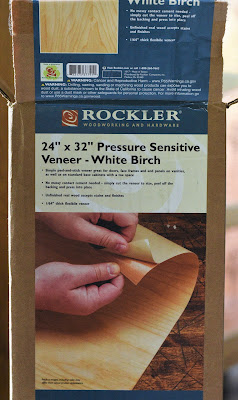
If you're not familiar with what wood veneer is,
it is paper thin cuts of natural wood
that is applied with glue and can be
stained or painted.
I had never used wood veneer before and was a
little intimidated by it. I pulled it out and unrolled it
and laid a sheet of plywood on top of it for a few
days to try and flatten it out. I really didn't have to
worry about flatting it out. This veneer was so
incredibly easy to cut and apply.
It adhered so smoothly without any cracking or bubbling.
Using a utility knife I cut out each drawer front and applied.
Super, super easy to apply. I was very impressed with this veneer.

Here is a close up of the drawers with the new veneer applied and stained.
You can't even tell that there is wood veneer on this dresser.
To create the new sides
Hubby used (2)  
2' x 4' x 1/4" sheets of birch plywood
and roughly cut out the leg opening.
The sides were then adhered using wood glue and set to dry overnight.
Once dried and secured I was able to sand the leg opening
smooth to match the leg shape.
The top of the dresser was created using a piece of
3/4" 2' x 4' piece of birch plywood. I wanted the top
of the dresser to be a 2 inch thickness. In order to have
a 2 inch thick top Hubby built it up using scrap wood.
To finish the edges of the top to look like a solid piece
of wood I used this veneer edge banding.
Can you tell it's not a 2" thick piece of wood?

The final step was to apply the veneer edge banding around the front of the dresser.
Using the same edge banding, I applied it then trimmed it down to size using
a utility knife.
Once all the veneer had been applied, I lightly sanded the entire
dresser down and applied the stain. I combined 2 different
stain colors to achieve the look I was going for.
I first applied 2 coats of Minwax Special Walnut.
The color was a little too red for me so I then
applied 2 coats of  Minwax Weathered Oak.
By applying the weathered oak it knocked down
the red tone to a nice warm brown color.
Exactly what I was aiming for.
Minwax Special Walnut and Weathered Oak.

To protect all of our hard work,
I applied 3 coats of water based Minwax Polycrylic
in Clear Satin to the entire dresser.
Hubby drilled new holes and added the new
handles (which I ordered off Amazon)
and just like that, we were done.

By investing a little bit of sweat equity
we now have a beautiful new dresser.
How appropriate is my sign that I made 2 years ago?
That's it for now.
Until Next Time,
Stay safe.
Veronica

Sunday, May 31, 2020

Dresser Transformation

Do you love seeing a good before and after transformation?
I love to bring new life to old worn out
furniture that has seen better days.
I especially love working on old dressers.
I've done my fair share of furniture
transformations and I am always
amazed at how I am able to transform
each tired and worn piece into something
beautiful that I am proud to display in our home.

Our Son and daughter-in-law were using this
dresser in their master closet and were in the
process of re-doing their closet to incorporate
better storage space. They really didn't want
to put this dresser back into their closet so
they asked me if I was interested in it.

Ah, Yah!

Oh I love rescuing old dressers.
What better time to transform a piece of
furniture than during a pandemic.
I couldn't wait to start transforming this piece.
It had a lot of damage but that didn't bother me.

It was a solid, sturdy piece of furniture with a thin layer
of wood veneer covering the entire dresser.
Other than the wood veneer being damaged
and peeling off the front of the drawers,
the drawers themselves were dove-tailed and in great shape.

The top of the dresser was badly marred and looked
like it had burn marks.

   
Are you ready to see the transformation?

Here goes.

TA DA!

Here is the before and after comparison.


Isn't it beautiful?
Check back next week and I'll reveal how I transformed this piece.

Until Next Time,
Stay Safe.
Veronica

Sunday, April 19, 2020

5 Myths About Gray Hair

Let's just start off by me stating that I am
in no way trying to convince anyone to go gray,
nor am I saying that dyeing your hair
is a bad thing and you are less than.
Going gray is such a personal journey.
I know some women who would NEVER
let their hair go gray and that's O.K.
It's your journey. Own it.
I used to be one of the latters.
I never thought that I would let
my hair go gray.
That thinking changed when I went
through menopause.
Oh how menopause made me change
my thinking in many aspects of life.
One change it made me do was 
overcoming the stigmas and myths
about gray hair. 
How ironic that menopause struck me at the same
time as "Going Gray" was a trend.
I never cared about being trendy.
I've always wanted to age gracefully
and menopause made me rethink
what aging gracefully meant.
So I am listing 5 stigmas, or myths,
about gray hair and how I overcame
and debunked them.

#1
Gray hair is only for old people.

FACT:
Apparently not.
I had my first gray hairs when I was 16.
Gray hair is genetic.
If one or both of your parents had gray
hair at an early age, chances are, you will
have gray hair at an early age. Gray hair
is a lack of melanin and you can lose melanin
at any age. Both my parents were gray early.
As much as I tried denying it,
I didn't stand a chance of not being gray early.

#2
If a woman has gray hair it should be short.

FACT:
I'm not sure where this thinking came from.
I have met a lot of women with long gray
hair that is absolutely beautiful.
I used to work with a woman that was
in her early 30's at the time that had the most beautiful
long silver hair. She said that she was completely gray
by the time she was in her early 20's. She just accepted
that she was going to be gray early and never thought about dyeing her hair.
Everyone was fascinated by her hair, both men and women.
She was a true unicorn.

3.
Gray hair is coarse and wiry.

FACT:
My naturally curly gray hair is softer than my colored hair every was.

Granted, naturally curly and gray hair tends to need more moisture than straight hair.
By washing my hair with chemically laced shampoos and conditioners,
along with dyeing and blow drying my hair,
I lost even more moisture creating dry, brittle, frizzy hair
along with hair loss.
Once I gave up all the chemicals in hair
products, deep conditioned my hair weekly
 and stopped blow drying my hair,
 my hair started to grow back and
became softer, fuller and the curls reappeared.
Here is a view of the back taken just last week.
I never realized just how curly my hair was
until I gave up all chemical laced hair products.
I have curls that go on for days.

4.
If you have gray/silver hair, you can't be stylist or sexy.

FACT:

What HOGWASH!

Just the other day I was checking out at the supermarket
and the young woman at the checkout complimented me
on my hair stating that it was "super cute" and asked how
I get it that color and how do I get it to curl that way.
She was dumbfounded when I told her that it was my
natural gray color and curl.
As for being sexy, Hubby calls me his "Little Silver Foxette."
And he is the only one I want to be sexy for.


5.
Gray hair makes you look older.

FACT:

I'll state again, HOGWASH!

You can look old no matter what hair
color or age you are.
It all has to do with how you present yourself.
Do you dress in sloppy, baggy, dark drab colored clothes,
or do you dress in properly fitted clothes, in colors that
compliment your skin tone?

As we age, not only does our hair become lighter,
but our skin becomes thinner and lighter in color
as well. If you are a woman who doesn't care to
wear make-up, no worries. By adding a little
complimentary color close to your face, in the
form of a shirt/blouse, scarf or jacket,
a pair of pretty earrings,
or even a touch of light color to your
lips will add a little needed
color back into your complexion. I'm not saying
that you can't ever wear black, navy or even gray
clothes again. If you choose to wear these colors
close to your face add a bright scarf, earrings
or necklace close to the face, or a touch of lipstick/gloss.

I have never kept my age a secret.
I have been mistaken numerous times both by
women and men, young and old, for someone much younger,
both before going gray and during my silver transition.
 I can't tell you how many times I have been
mistaken for my husband's daughter before going gray.
Just because he was prematurely gray.

Excuse me for getting a little side tracked but I
 have to tell you this sweet story.
One day last year while I was going through my silver
transition, I was watching my twin grand babies
and a friend of my daughter-in-law and her
 2 children stopped by to see the twins.
Her daughter was about 10 years old at the time.
The daughter asked me if I was the Mommy.
I told her that I was the Grandma.
She said "really?"
She then got a shocked look on her face and said to me that,
 "you don't look like a Grandma."
I could have hug that child.
I was just as shocked by her statement as she was by mine.
Her mom was just as shocked by her statement as well and said to her daughter,
"Whoa girl, how to give a compliment."
What can you say to that other than,
"Out of the mouths of babes."
Here is a picture of me at the beginning of my gray journey last year.
Age 57.
And this is me 1 year into my silver journey at age 58.
Does this look like an old gray haired woman?
Older looking?

You decide.

Here I am just shy of 13 months in my silver transition phase.
Notice how the lighter, brighter colors compliment
my changing hair and skin tones.

So there you have it, my 5 myths about gray hair.
I personally am very attracted to people with silver/gray hair.
I think it is absolutely beautiful no matter who
or what age the person is.
One thing that I have learned in life is:

Your hair color doesn't define who you are.
How you act and react to situations will.

Here's to aging gracefully.

Until Next Time,
Veronica


Sunday, March 29, 2020

Why Silver Hair?

I noticed my first gray hairs when
I was 16. I was horrified to say the least.
I was too young to be gray.
Gray hair was for old people.
So I plucked those suckers out
and went about my life.
It wasn't until I was 28 years old
that those dreaded gray hairs
were noticed again. A co-worker
made the comment that I had a
"lot of gray hair for such a young person."
I am a natural brunette
so those dreaded gray hairs really stood out.
That is when I started dyeing my hair.
It started with just a few highlights to
help blend those grays. I would get
highlights every 6-8 weeks just like
clockwork. Each time I got 
my hair highlighted I was becoming
more of a blonde than a brunette.
 It finally got to the point
that I just started to have my hair
dyed blonde every 4 weeks because I had more
gray in my hair than I did brown.
I never intended on becoming a blonde,
I was just trying to hide those dreaded gray hairs.
I continued this madness for the next 29 years.
I knew that hair dye was loaded
with "bad for you" chemicals yet I wasn't
ready or willing to go gray so early.
Then menopause made its' appearance.
I noticed that my hair was becoming
dry and brittle and I was losing massive
amounts of hair. How in the world was
I going to stop the hair loss, or at least
slow it down?
That's when I decided to stop dyeing my hair. 
I would rather have gray hair
than have no hair.
When I first mentioned to Hubby that
I wanted to quit dyeing my hair and
just let the silver shine, his response
was, "You don't want to do that, you're
too young." I was 57 at the time.
Apparently, I wasn't too young,
I was almost completely gray.
So on May 23rd 2019 I stopped
having my hair colored.
This is how my hair looked before
I started on my silver journey.
It's hard to tell how
fragile my hair was in this picture.
It was going to get worse before
it got better. Once I decided to stop
dyeing my hair, I noticed that my
hair loss was slowing down a little. I was
still losing it, just not as fast.
Even though I was still losing my
hair I continued getting a trim
every 8 weeks.
By month 4 I had lost so much
hair in the front and throughout the rest of
my head that it was really noticeable,
plus I was losing my natural curl.
 I've always had a high
forehead, but this was getting ridiculous.
I was literally going bald.

I needed to try and do something else
to try and stop my hair loss. My next step was trying to get
my hair back to being healthy. I completely stopped
using shampoo and conditioner that contained
sulfates, silicones and parabens and deep conditioned my
hair once a week religiously. Only hair products
that contained all natural ingredients were used
on my hair. Also, no fry drying (blow drying) or
hair straightening. Just wash with all natural
ingredients, finger comb and scrunch up with my
hands then let air dry.
By the end of month 5 my hair was becoming fuller
and the hair loss was very minimal.

And my curls were reappearing.
By month 6 I stopped washing my hair every day
and started only washing it 1-2 times weekly.
This is how my hair looks after 3 days without washing.
And on wash day.
By month 7 I was finally on the right track.
My hair was becoming fuller and hair loss
had slowed down immensely. Now it was time
to focus on growing out that silver.

Month 8. Still growing. It's a SLOW process.
 Month 9 I had 2 inches cut off. Just to remove
some of the dry brittle colored hair.
 You can really notice how it has filled in in the front.
Month 10 I had an additional 3 inches of colored hair cut off.

 It's getting so healthy.


 Month 11.
The silvers are really starting to show off.

1 year dye free.
Once Hubby realized that I was committed
to this journey He became my biggest supporter.
He now calls me his Little Silver Foxette.
 And that makes me oh so Happy!
What a difference a year can make.
Don't you agree?

That's it for this week.
Until Next Time,
Veronica


Sunday, March 22, 2020

It's Been 1 Year!

Oh my but it's been a while since I've
posted anything here on  my blog.
Life has been moving along and
not much has been happening here
as far as any new projects being created.
Our grandbabies keep me very busy.
Time spent with our grandbabies is
more important to me than any DIY projects.
Even though the DIY projects have come
to a screeching halt, my silver hair journey
has been moving along at a steady pace.
I just realized that I haven't been posting
my monthly updates on my silver hair journey
here on the blog. When I decided to stop dyeing my hair,
I started an Instagram account verniep0884 to document
my silver hair journey and was posting my monthly updates on that.
My Instagram account will automatically post to my Facebook
account  also. 
So let me catch you up on my silver hair journey.
I have finally reached the 1 year mark of growing
out my silvers!
Here is a reminder of how I looked at the
start of my silver hair journey
and here we are today.
1 year later.
What a difference a year can make.
I am loving my new hair color
and haven't regretted my decision to
go silver one bit.
Can you tell how happy I am?
I still have a ways to go to be completely silver
but I am in it for the long haul.
I will try to do a post about why I decided to
go silver and the myths that go along with
silver/gray hair.
I hope you have a lovely day and stay
safe and healthy.

That's it for today.
Until Next Time,
Veronica