Sunday, June 28, 2015

Copycat Pottery Barn Starfish Candles

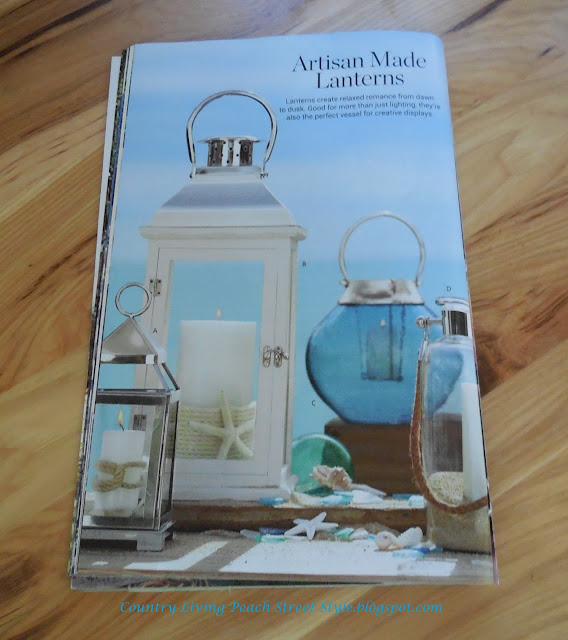
This is a page from the latest Pottery Barn catalog.
Doesn't it just make you long for the beach
and those lazy days of summer?
 
 
I LOVE lanterns and candles.
I've been known to collect a few over the years.
 
I liked how Pottery Barn displayed the candle with the starfish in the lantern.
I was going to buy the starfish candle but it wasn't for sale.
Not a problem.  I'll just make my own.
 
This is my version of the starfish candle.
 
 
I replaced the white rope with jute rope and
used a flameless candle with a timer for my candle.
I haven't burnt a real candle in years since I discovered these flameless candles.
I love these flameless candles with automatic timers.
I don't every have to worry about them being a fire hazard, plus I can
set these to turn on at anytime and they will automatically turn
off after 4-8 hours depending on when I set them.
They look so realistic that no one will know that they aren't
real candles, even in the daylight.
We love the ambience of candlelight.
We have numerous flameless candles around our home.
It's so comforting to walk into a room and see the gentle
glow of the candlelight.
 
Hubby and I decided that we wanted to go to one
of our favorite restaurants, Maggiano's.
 
This restaurant is connected to a Mall that
has my ALL TIME FAVORITE home
décor store, Pottery Barn.
 
After dinner we usually, (actually I insist)
that we walk around the mall to help
work off some of our dinner.
(But we know that the REAL reason
is so I can window shop and get ideas
and maybe buy something, he, he).
 
And wouldn't you know, somehow we
ALWAYS end up in the Pottery Barn Store!
 
While browsing, (really drooling in my case)
we came upon these HUGE lanterns.
These were the exact ones I saw in the catalog
and really, really, I mean REALLY liked.
 
 
Hubby liked them too until he looked at the price tag!
Original price $99.00 for 1!
Marked down to $78.00.
Too pricey for our budget so we kept on browsing.
As we were heading out of the store we spotted a
second one.  Hubby stopped again and looked at
it and checked the price tag again.  This one was
marked down to $58.00.  Same lantern and not
a thing wrong with it.
$99.00 marked down to $58.00, SOLD to the lady who was drooling!
 
We took it to the checkout counter to pay and I noticed that when
the sales lady rang it up it said $38.00!  I told her that the tag stated $58.00.
She said that they just marked them down again that morning to $38.00
and they must have forgotten to swap the tags out.
 
REALLY?
 
So Hubby went and got a second one!
 
We got 2 lanterns for less than the original price of 1!
Ya gotta LOVE a sale like that!
These lantern aren't only HUGE they're HEAVY too.
 
These lanterns measure 8.5" sq. x 20" h.
 
 
So I was able to place my new starfish candle holders inside these beauties!
This is my version of the Pottery Barn look.
 
 
For now I placed one on each side of my cupboard that sits
in the dining room.
 
 
I have visions of decorating these for Fall, Winter and Christmas time.
 
Here is how I made my starfish candle holders.
 
Supplies:
 
glass jar - purchased at Walmart for 97 cents
Jute rope - already had this
starfish - purchased from Michael's
Hot Glue Gun
 
 
Because I use these candles year round I didn't want to glue the
rope and starfish on the candle, thus the glass jars.
 
Place a drop of hot glue at the base of your jar and attach the rope.
 
 
Wrap the rope around the entire base, gluing in various spots as you go
until you reach the beginning.
 
 
Continue wrapping and gluing until you have 2/3 of the glass covered,
ending in the same spot as you started.  This is the back of your jar.
Cut your rope and glue to finish off.
 
Grab a starfish and hot glue to the front.
DONE.
Place a candle inside and you're ready to display your new candle holder.
 
 
I made one to go on my newly paint little stand also.
 
 
That's it for this week.  I hope you enjoyed seeing my starfish candle holder.
Check back next week to see what else I purchased from Pottery Barn and
what I did with it.
 
Until Next Time,
Veronica


Sunday, June 21, 2015

It Started with a little Knob

A couple months ago I was browsing through
Hobby Lobby and this knob caught my attention.
 
 
It was only $3.99.
So I threw it in my basket because it was just too darn pretty to pass up.
 
I didn't have any plans for it but I knew eventually I would
come up with something that I could use it for.
 
I've been wanting to try my hand at painting furniture.
Sure, I've painted picture frames which were simple enough,
and one chair, which I took a class and had an instructor
there through the whole process, but nothing since then.
 
We have this little stand that sits in the corner of our dining room.
(I removed the items I had on it so that you all could get a better look at it)
 
 
It has been with us for a good 30 years.
We were a newly married couple and it was what we could afford at the time.
It's a Sauder brand that has held up really well over the years,
even through all of our moves.
It's made out of wood and laminate.
I was going to donate this to our local Goodwill store because it was laminate,
  but for some reason we have held onto it even though all of our
other pieces of furniture are solid oak.
Not sure why, maybe because it was in such great shape?
 
Since this wasn't an expensive piece of furniture I thought
that I would just take the plunge and paint this.
If I happened to mess it up I wouldn't feel so bad.
 
Did you know that you can paint laminate and it turns out beautiful?
 
Well you can!
 
Say Hello to my newly painted laminate stand.
 
 
What a simple way to change up and freshen
the look of your home.
 
All it took was a little bit of paint and time.
 
I have been adding touches of aqua color in our
kitchen and dining room areas.
 
This little stand really helps lighten up our dining room
and adds a little pop of color.
 
The blue color on the stand is called Ocean Kiss by Behr.
Love that name, Ocean Kiss.
It is such a soft, pretty blue color.
 
I purchased a sample bottle for under $3.00.
This was more than enough to paint the top of this stand.
 
The white color is also by Behr and is called Ultra Pure White.
 
Both of the paints have the primer mixed in and are a flat finish.
Having the primer mixed in with the paint saves you an extra step.
You pay a little more but it is so worth it to save that extra step.
 
I put 2 coats of paint on just to make sure that all the dark wood
was covered and didn't show through.
 
After I painted it I made sure that I sealed it with
a finishing wax to protect my beautiful paint job,
and buffed it until it had a nice shine.
 
I think it is just lovely now.
 
 I'm so glad that I did a little research before donating it!
 
Here are a few more views of this pretty stand.
 
A side view.
 
 
Here is a top view so that you can see how soft the blue color is.
 
 
See how perfectly the paint color and knob match?
 I actually took the knob with me to Home Depot to pick out a color to match it.
 
Beautiful!
 
Hubby wasn't too thrilled about me painting ANY furniture.
But once I got it all done all he could say was
"Wow that turned out really nice!"
 
I don't know why he questions me all the time!
You would think he would know me by now!
 
Here is one more shot of the knob that started it all.
 
 
I envision lots of other furniture getting a face lift.
The hard part is deciding what color I want to paint them!
 
Until Next Time,
Veronica


Thursday, June 18, 2015

Summer Lovin'

 
Strawberry season is in full swing here in Wisconsin!
 
I woke up this morning at 7:00.  It was overcast with a light breeze.
Perfect weather to go strawberry picking!
 
I didn't have to worry about getting sunburned and I knew the
breeze would keep the mosquitoes away.
 
So off I went to our local strawberry patch.
 
We have a strawberry patch that is about 5 miles from our house.
If you are in our neck of the woods you have to check out
this strawberry patch!
 
 
Their strawberries are BIG & SWEET & JUICY!
This is their first year for strawberry picking.
They have quite the set up for picking strawberries.
You get a covered wagon ride to and from the
strawberry patch.
They even have pre-picked berries for purchase if you
aren't into picking your own.
In the Fall they have an amazing Corn Maze which is the
biggest corn maze in Wisconsin, and a pumpkin patch
where you can pick your own pumpkins.
This farm offers many other family fun
activities that you must check out.
 
Back to the strawberries....
I actually enjoy picking my own berries.
I know, I'm weird that way.
It took me a little over an hour to pick
40 pounds of berries!  Yes, you read that right.  40 POUNDS!
This is one of the containers I picked.
 
 
This picture doesn't show how BIG these berries are.
Sometime when berries get too big they become woody.
THESE ARE NOT LIKE THAT!
You bite into one of these and the juice runs down your chin!
 
 
I like to make strawberry jam and freeze some so that we
can have Strawberry Shortcake during the winter months.
YUM, YUM.
 
Speaking of Strawberry Shortcake.....
We just had to have some after dinner tonight!
 
 
So.  Do you like to pick your own strawberry, or do you prefer to buy them
already picked?
 
 
That's all I have for today.
 
Until Next Time,
Veronica