Sunday, April 3, 2016

Inexpensive Roman Shades & A Story

Today is all about inexpensive custom made Roman Shades.
When I revealed my custom made Roman shades
in our kitchen I told you that I would let you in
on my little secret as to where I got them made.
If you have ever gotten a price to have custom made
Roman shades with a design you already know how EXPENSIVE they are!
 
So I did a LOT of shopping around,
and I found this really inexpensive place to get custom
made Roman shades that look beautiful and high end!
 
My secret place where I found inexpensive custom
made Roman shades is.......

My Own Home!
 Yep.
They were made right in my house by little ol' me!
I really wanted stylish custom made Roman shades until I found out the price!
Let's just say that I was NOT going to fork over that kind of money!
Ummmm, no, NOT HAPPENING!
Not now, not EVER!
 
Believe it or not,
I made these out of our cheap, boring mini blinds!
 
These are super easy to make because there is NO SEWING REQUIRED!
 
The first one I made took me about 1 1/2 hours from start to finish,
after that I had it down to 3/4 - l hour.
 
Here is my step-by-step tutorial so that you can make
these inexpensive Roman shades also.
Don't be intimidated by all of the steps,
they really are easy to make.
 
 
A few supplies that you will need:
Mini Blind that fits your window (recycle one, or buy a cheap one from Walmart)
Tape Measure
Liquid Stitch Fabric Glue
Heat-n-Bond Hem (use 1/2 inch size)
Scissors
Iron and Ironing Board
Material
(I used Home Décor fabric that I purchased for 50% off)
 
LET'S GET STARTED!
 
 I recommend reading all the steps before proceeding.
 
Iron your material to remove any wrinkles or creases and set aside for later use.
 
Lay out your mini blind and extend it to its full length.
Measure the length and width of the mini blind
and write it down for later use.
 
Measure your fabric 1 inch wider and 2 inches longer than your window opening.
Mark and cut your fabric.
Fold in each side 1/2 inch and press.
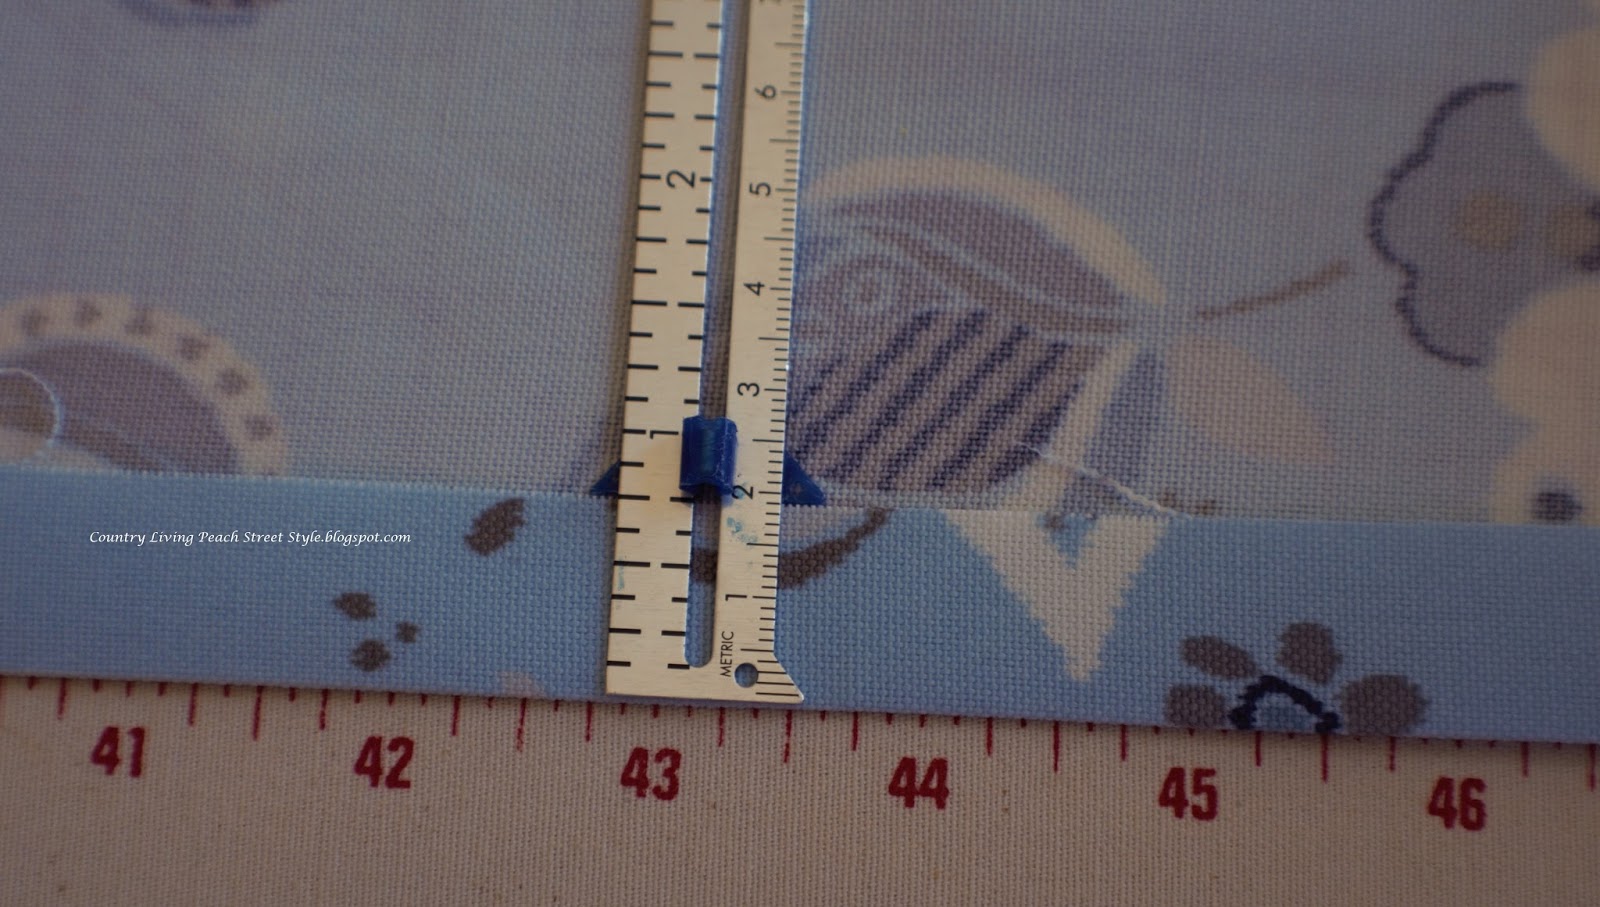
Lay your hem tape inside the fold and press in place.
 
A perfect No Sew Hem!
Lay your fabric face down on a flat surface.
I didn't hem my top and bottom.
I just made sure I had a straight edge after hemming the sides.
Grab your mini blind and wipe any dust or grease from
your top bar and dry.  Apply a generous amount of fabric glue
to the front top bar of the mini blind.
Spread the glue across the bar.  I used my finger.
Grab the top of your fabric and secure to the top glued section of the mini blind.
I smoothed out the fabric using my hand and then secured it with clothes pins.
Let dry for 30 minutes.
While you are waiting for the glue to dry, extend the mini blind
and locate the two types of cords that run through the blinds.
There should be a thicker cord that runs through the blinds,
and a ladder-looking cord that supports each blind.
Grab the ladder-looking cord and cut each ladder cord and remove.
*DO NOT CUT THE THICKER CORD*
 
 
Locate the plugs on the bottom bar and remove.
Untie the cord and remove the bottom bar from the mini blind.
*DO NOT CUT THE CORD*
Remove the slats.  Don't throw them away!
Using your tape measure, determine how far apart you want your slats
for your Roman shade to be spaced. I spaced mine every 6 inches.
I used a total of 5 slats.
Using a pencil place a mark on each side of the fabric. Slide the number
of slats back onto the pull cord with the rounded side face down and
line them up with your pencil marks.
Starting at the top slat, turn the slat over and run a line of glue
across the rounded side, being careful not to glue the pull cords.
Turn the slat over and press onto the fabric at the marked lines.
Continue with the rest of the slats in the same manner.
Feed the bottom bar back onto the pull cord.
Tie the knot in the cord and replace the plugs.
Fold the bottom fabric up and glue to the bottom side of the bar.
Secure in place.  Let dry for 30 minutes.
Now, go hang that beautiful Custom Made Roman Shade!
No one will be able to tell that these are made out of cheap mini blinds!
These Roman shades will raise and lower just like your mini blinds.
Because I had everything except the material to make these
Roman shades I spent around $15.00 per shade.
What an easy and inexpensive way to update your mini blinds,
plus you get the added bonus of having a custom designed look for less!
That sounds like a win, win to me!
I'll take custom designed look for LE$$ any day!
How about you?
 
Oh, I almost forgot to tell you the story about my Roman shade.
When I went to the fabric store to pick out the fabric for my
Roman shade for our master bath, I took along a paint swatch,
our new shower curtain, and one of the bird prints with me.
I don't like to make extra trips because something doesn't
coordinate so I try to take things with me and coordinate
them in the store.  As I was walking around the store
trying to coordinate my things with the fabric, I noticed
a woman who was always behind me wherever I went.
I finally decided on which fabric I wanted and headed to
the cutting counter.  I laid my stuff on the cutting table
along with my fabric.  The women at the cutting counter
always ask what your doing with the fabric.  I mentioned that I
was in the process of redesigning our master bath and
I was going to make a Roman shade from a mini blind
using the fabric.  As I was waiting for my material to
be cut the woman who had been following me around
the store approached me and ask if I was a Professional Decorator!
I looked at her with a surprised look on my face and told her,
"No I am not, I'm just redesigning our master bath".
She wanted to know if she could hire me to redesign her home!
Again, I looked at her with this shocked look on
my face and sadly told her that I work a full time
job and am in the middle of redesigning our
own home and that I am limited on time.
To say that I was flattered is an understatement!
I have had this happen to me before at a different
fabric store.  I think I look like a "professional"
because I bring things with me to the store
and act like I know what I'm doing.
I realize not everyone likes my "style"
and I'm o.k. with that.  I style our home to suit
our likes and what feels warm and inviting to us.
 
I hope you enjoyed my little tutorial and story today.
 
That's it for this week.
Until Next Time,
Veronica
 

Sunday, March 27, 2016

Master Bath Reveal!

I'm so excited to finally be able
to reveal our master bath makeover.
We didn't do a complete overhaul,
just changed a few things that needed
to be freshened up and updated. 
I only have a few pictures of how it looked before,
but that's o.k. you'll be able to see the difference!
I thought that I had more pictures in my files
so I didn't take any new ones. Oops!
Our master bath is not a large room
so it is hard to get everything in one shot.
We only have a single sink, but we have
a separate tub and shower.

Are you ready to see what we have
been up to?


Well then, let's get started!
This is what we started with.
I'm sure that this look was in when the previous owner
hung this wallpaper and tile.
To the left of this picture is where our shower area is.
This is our sink area.
I was able to snap a quick picture while Hubby was starting to remove the wallpaper.
These are close ups of the wallpaper and the tiles around the tub.
The wallpaper is pink and blue with gold veins and dots throughout.
And the tile was pink, gold and gray.

It was WAY PAST time for an update in this room!
We went from this....
...to THIS!
What a difference, right!?
This picture shows the true paint color.
Who thought that grays could look so pretty?
These are the changes that we did to this room.
 
1. We removed the wallpaper and painted the room Natural Gray by Behr.
 
2. Removed the tile around the tub and replaced it with bead board.

3. Painted the trim and bead board Ultra Pure White by Behr.
 
4. Removed the old shower door that was glass with gold trim and replaced it with 2 (84") curtain panels with grommets that I purchased from Bed, Bath & Beyond and added a regular length shower liner. Sorry I don't have a picture of the shower door. Hubby removed it while I was out buying paint.
 
We will NEVER have another shower door EVER!  They are too much work to keep clean!
I didn't want your basic 72" shower curtains because:

1.  They are just too short making a small room appear smaller and chopped up.
2.  They don't completely cover the tub/shower area from the top of the tub/shower to the floor area.

Tip:  By adding 84" drapery panels it tricks your eyes into believing that your
     walls are taller than they appear, plus you get more of a designer look
which is what I was aiming for.

Here is a close up of the drapery panels and the shower liner.
 A close up of the bead board.
Hubby did a fantastic job hanging the bead board.
You can't even tell where he pieced the pieces together.  And how about that caulk line!
Perfection!
5. I swapped out the picture above the tub and replaced it with a bird picture that I found on line. I created 2 prints which I then matted and framed.
 
6. Spray painted the gold faucet and jets on the tub with Metallic Aluminum by Rust-oleum.
 Luckily the floor tile and grout are in excellent shape.
7. Removed the mini blind and replaced it with a custom made Roman shade.
Isn't that material gorgeous?
I have a story about this Roman shade that I will share with you at a later time.
The sink area just got a good scrub down.
We had already replaced the old builder grade light fixture a few years earlier.
The black thingy on top of the cabinet is a portable wireless speaker that connects with our smartphones so we can listen to music in the bathroom.
Because we are limited to only one sink, I like to keep our sink area clutter free.
8. And finally, I swapped out the picture that was above the commode with this print that I  ordered from Dear Lillie and framed.
A close up of the print.
A verse from one of my favorite songs.
This is a view from our master bedroom.
Of course, our photo bomber just had to get in the picture.
There was no way that she was going to move out of the picture!
We are LOVING our new updated master bath!
It finally looks light and airy.
Hubby and I work good together.
I'm the designer and mess cleaner-upper,
and Hubby is the grunt laborer!
I hope you enjoyed our little tour of our master bath update.

Next up is the half bath!

That's it for this week.
Until Next Time,
Veronica

Sunday, March 20, 2016

A Couple of Updates in the Kitchen

 I'm keeping my fingers crossed!
 
Next week I'm hoping to post the
reveal of our Master Bath.
YES!
I just need to get my butt in gear
and clean up the messes!
 
We tend to work slooooow around here.
We usually only have one day a week
to work on our home improvement projects.
 
While Hubby has been busy working on the
Master Bath, I thought that I would
work on projects for the other rooms
in the house that needed updated.
 
One of the projects was to replace
the mini blinds in the kitchen.
I have always wanted to replace
them but wasn't quite sure what I wanted.
One thing I did know was,
 I didn't want to block the natural light
or the view from the windows.
 
Well, I have finally decided what I wanted!
FINALLY!
 
This is what the back door looked like before I made the change.
Mini blinds that were in the house when we moved in!
Not that there was anything wrong with them,
they were just blah looking.
 
We replaced them with custom made Roman Shades!
Custom made, yikes!
Isn't that material beautiful!
When I saw the material I knew that it would
be a perfect match for our new neutral look we are aiming for.
 
Being neutral doesn't have to be boring!
 
Our kitchen is one of the hardest rooms in the house to photograph.
Please excuse the poor photography. 
These are the best pictures I could get of the Roman shade
above the kitchen sink.
 
 Since we hung new neutral color Roman shades,
the blue color on my DIY botanical prints just wasn't
cutting it any more.
They got a new paint job with the French Linen color.
 Now they match the new Roman shades!
Parsley
Thyme
Rosemary
 
I can raise the roman shades during the day,
and lower them at night.
I'll do a post later about where to get custom made Roman shades
that don't cost an arm or leg to have made. 
 
And just one more little bit of sweetness I would like to share.
 
Even though we aren't Irish,
I thought that I would make a pie using Bailey's Irish Cream
in honor of St. Patrick's day.
YUMMY, YUM, YUM!
Hubby couldn't wait to dig into this!
That's it for this week.
Until Next Time,
Veronica

Sunday, March 6, 2016

French Linen

Remember my cheap little stand that I gave
a facelift to?
No?
Here is a picture to refresh your memory.
This is what it looked like before my paint brush got ahold of it.
And this was the after.
Well, I did it again.
I've changed a few things in our home office already!
I know, you're shocked, right?
I'm sorry, I just can't help myself!
 
Sometimes my rooms take time to evolve.
I like to do a little at a time, and sit back and ponder things,
and then do a little more as inspirations strike me.
 
Hubby had a doctor appointment a couple of weeks
ago and there happened to be a TJ Maxx close by.
So we stopped, and I found this.
I couldn't believe the price!
$23.00, with the lampshade included!
I've always admired these glass lamps, but not the price of them.
This one was marked down from $65.00 because
the little glass ball at the very top had fallen off.
They had it taped to the side of the lamp.
Really?
I grabbed that lamp so fast and headed to the checkout.
This elegant baby was coming home with me, loose finial ball and all!
I brought it home and glued the ball back on using E6000 glue.
Good as new!
Then placed it in our home office.
 
 
So, back to the story about the little blue and white stand.
It was the elegant glass lamp that started the domino effect.
This little stand just didn't seem to fit in anymore.
So, out came the paint brush again!
And this little stand got another facelift.
I left the bottom half the same color,
but painted the top using Annie Sloan,
French Linen, it's a dark gray with brown undertones.
 Depending on the time of day, the top of this stand can look brown or gray.
 
Then I swapped out the knob with a
beautiful glass knob that I found at Hobby Lobby.
 Now this little stand is beautiful,
and elegant, and perfect,
and fits right in.


Isn't it amazing what a little paint can do? 
That's it for this week.
 
Until Next Time,
Veronica