One thing I've discovered about myself is,
I love to restore old furniture.
I find it very therapeutic.
Plus, I love a good challenge.
I enjoy taking an old time worn piece
that had seen better days and turning it
into a beautiful piece that I'm proud to
display in our home.
I've restored pieces that I've picked up at
thrift stores for less than $10.00.
Pieces that have been donated to me.
Heck,
I've even been known to pick pieces
out of dumpsters to restore.
I'm always on the lookout for an old
piece of furniture to restore.
My father-in-law has a dresser that I've
had my eye on for years.
This dresser has been in my Hubby's family for
generations and holds a ton of sentimental value.
I mentioned to my father-in-law that I would like
to have that dresser some day.
Well, that day has finally come.
Once we got this baby home I did a quick assessment.
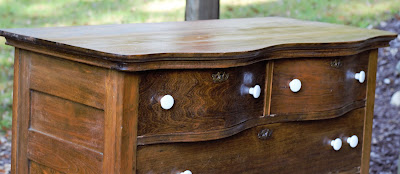
Although the picture above looks nice, this dresser
needed a lot of TLC.
It had been stored in a damp basement and had a lot
of mold all over the entire dresser, both inside and out.
At some point in time, something was spilled on the top and
was never cleaned off, causing damage to the top corner.
This side of the dresser had a lot of moisture damage.
I was pretty sure that I would be able to repair
all the cosmetic damage that this dresser had.
What I wasn't completely confident about was trying
to get rid of the musty mildew smell that permeated
the entire dresser.
It was bad.
Real bad.
First up was tackling the mold issue.
I completely wiped down the entire
dresser inside and out with white vinegar
then let it bake in the sun for a couple of days.
To tackle the damage to the top,
I sanded it down as best I could
then set the dresser out in the sun
to dry out the wet area,
lightly sanding each day until
the area was completely dry.
This took approximately 2 weeks to complete.
I was hoping that by leaving the dresser out-
side for a couple of weeks it would take care
of the musty mildew odor.
Nope, didn't happen.
Not even a little.
Well, I'm happy to report that I was successful
at removing ALL of the musty mildew smell.
My secret.
This miracle product.
I'm not kidding, this stuff ROCKS.
I wasn't even compensated for saying that.
Using my spray gun, I completely sprayed
the entire dresser and drawers inside and out,
with the exception of the top which I sanded.
I also have to mention that Hubby replaced
all of the drawer bottoms with new wood.
The drawer bottoms were too moldy
and warped from moisture. It wasn't
worth the effort to try and salvage them.
As I mentioned earlier,
I'm always up for a good challenge.
This dresser was definitely a good CHALLENGE.
There were times I almost threw in the towel.
This time worn dresser went from this....

TO THIS.
Just look at how beautiful that top is.
And that damage to the top.
G.O.N.E.
I loved the original keyhole covers but didn't know
if I could remove them without damaging them, and
if I could remove them could I clean them up enough to keep?
They came off super easy.
To clean them up,
I soaked them in 100% acetone,
a.k.a. fingernail polish remover,
and used an old soft toothbrush.
Under all those layers of dirt and grime
was a beautiful gold tone.

Using a paint brush I applied 2 coats of Farmhouse white paint.
To protect all my hard work I applied 2 coats of polycrylic to
the entire dresser, even to the inside of the drawers.
Once everything was dry new knobs were added to dress it up.

I'm a sucker for those curves.
Aren't they beautiful?
Oh, and the side damage.
You would never know it existed.
The final step was to find wooden wheels that the dresser
had lost over the years.
Mission accomplished.

I'm so glad I rescued this dresser when I did
before it got to the point of no return.
We now have a beautifully restored family heirloom
that will continue to stay in the family for generations to come.
That's it for this week.
Until Next Time,
Veronica


