Sunday, August 28, 2016

How to Make A Farmhouse Clock

Would you like to make a Farmhouse
clock like mine?

Let's begin.

First, you will need a round wooden circle,
choose your size, and an image of how you would
like your clock to look.

My wooden circle measures 24 inches.
This is the image I used for my layout.
Lightly sand down the top and sides of the disc.
I didn't sand it smooth because I wanted a little
bit of imperfections.
I used my handy, dandy, hand sander to make sanding quicker.
Yes, this sander is all mine.
Wipe off all the dust from sanding.
I applied one coat of this stain to the top and sides.

I knew that I wanted the center of my clock to have the dark
stain showing.  I drew a 10 inch circle in the center and then
painted 2 coats of white paint outside the dark circle.  I wasn't
worried about getting a little paint inside the center circle.
Let your paint dry completely.
After the paint had dried, I lightly sanded over the whole disc
until I was satisfied with the look.
This is what I use to draw my large circles with.
This tool makes drawing circles a breeze.
Next, I drew 3 more circles to accommodate the
numbers and the second hand lines.
I didn't measure these, I just eyeballed them.
I created my Roman numerals using the Abraham Lincoln font
and sized them to fit my space.  I cut each set of numerals out
and placed them onto the disc using the template as a guide.
Once I was satisfied with the placement of the numerals,
I placed a piece of carbon paper behind each set and
traced the numerals using a ball point pen.
Once I had all the numerals traced, I used these to
outline and paint them in.
Figuring out how far I needed to place my second hand lines
took a little bit of math skills.  Once I figured it out I used
a piece of string and marked 2 black dots to use for a spacing tool.
I made my mark and moved the string for the next line to be marked.
I decided that I wanted my Farmhouse clock to be purely decorative
for now.  I can easily turn it into a working clock later if I change my mind.
To create my clock hands I purchased a piece of Balsa wood
from Michael's which costs $1.29.
I printed out a set of hands that I created from my Silhouette Cameo
machine.  I traced the hands onto the Balsa wood using the same
carbon paper method.  Once the hands were traced I cut them
out using an Exacto knife and painted them using the paint markers.
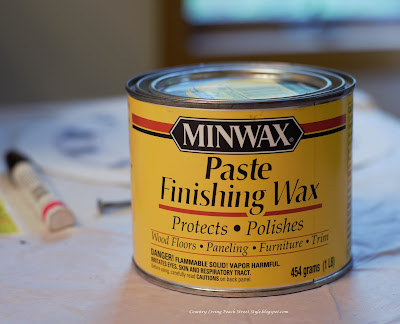
Before I placed the hands on the clock, I applied one
coat of this wax to the front and sides of the clock.
I wanted to protect all of my hard work.
In my haste to finish my Farmhouse clock I forgot
to take pictures of  how I attached the hands.
Basically, Hubby drilled a center hole for me
and I used a small piece of dowel rod and
glued it into the center hole.
 I placed the hands onto the dowel rod with
a washer between the two hands so that I
could easily move the hands to set different times
when the mood strikes me.
To hold the hands onto the dowel rod I
used a thumb tack that I painted using the paint markers
and pushed it down in the center of the dowel rod.

I found this package of hangers in Hubby's garage
and had Hubby attach the hanger on the back
of the clock for me.
And that was how I made our Farmhouse Clock.
I hope you enjoyed my little Farmhouse clock tutorial.

Until Next Time,
Veronica

Sunday, August 21, 2016

Perfectly Imperfect Farmhouse Clock

I don't know what it is about clocks
that draw me in.  I LOVE them.
I have clocks in just about every
room in our home and some rooms
have more than one.

Our Son and DIL bought this clock
when they moved into their home.
Hubby and I really liked this clock
when we saw it.  That's unusual for Hubby to
comment on home decor so I knew that he was serious.
Our Son and DIL bought this from the local HomeGoods store.
Unfortunately for us, this was the only one.  Dang. That's the thing
about HomeGoods stores, if you see something you like
you had better buy it when you see it.
So I have since been on the look-out for another clock similar to this one.
Have you seen all of the Farmhouse style clocks
that are popping up everywhere?


I love the style and simplicity of these clocks,
but what I don't love are the prices.  These
clocks are selling for $55.00 - $400.00 or more,
depending on the size you are looking for!

WHAT!!!!
SERIOUSLY?

Oh course, I wanted a big one.
I'm sure it has something to do with the show Fixer Upper.
Here is a shocker to some of you.
I have NEVER seen a Fixer Upper show!
I've heard plenty about the show though,
such as, how much I would like the show
because of the simple, clean styles and the DIY projects.
I know, it's crazy right?
I just don't have the time to sit and watch t.v.
I'm too busy creating my own style.

It doesn't look like I'm going to get a big Farmhouse clock any time soon.
(insert pouty face)

But wait!

I was wandering around Home Depot one
night with Hubby and came across this round wooden disc
and my wheels started turning.
I could make my own Farmhouse clock!
I was so excited to find this!
You should have seen the look on a couple of guys
faces in the aisle with me when I discovered this disc.
They were probably thinking "that is one crazy woman".
Seriously, how many woman get crazy over a piece of round wooden disc?
It only cost $6.88 and it measures 24 inches!
So it came home with me (I mean us).
Of course Hubby couldn't understand when I told him I
was going to make a Farmhouse clock with it,
 but that didn't stop me from throwing it into the cart.
This WOMAN was on a mission!

Here is our new/old Farmhouse clock.
It is Perfectly Imperfect.
I LOVE it!
It appealed to Hubby also because he commented that
"I make really nice things".
Isn't he just the sweetest.

It turned out just how I imagined it would.
And the best part about this DIY?
It costs less than $10.00 to make!

WHAT!!!
SERIOUSLY????

Yes, seriously.
I had everything except the round wooden disc
and the Balsa wood to make the hands.

My mission has been completed.
If I get tired of the clock above the fireplace
there are a lot of other areas in the house
where this clock will look good.

Check back next week and I will show you
how I created my Perfectly Imperfect Farmhouse Clock.

Until Next Time,
Veronica


Sunday, August 14, 2016

Fooling The Senses

I have been asked if I could make some cupcakes
for our DIL's upcoming baby shower.
Imagine that, me being asked to bake something.

Oh, and they had to have a nautical theme to them!

What is that you say? 
Another challenge?

I've made plenty of cupcakes before,
both from scratch and a box mix,
but nothing that had a theme to it.
I was more than willing to contribute
to helping with the baby shower in any way I could.

Challenge accepted!

Because I have to make so many cupcakes,
I wanted to be able to make the cupcakes
quickly, but yet I wanted them to look
and taste like they just came from the Bakery.
Have you ever bought cupcakes from a Bakery?
They look and taste so good!

That's how I want my cupcakes to look and taste!

I thought I would play around with a few recipes
before the shower and take them to work to see what
my co-workers had to say about them.

My co-workers LOVE to be my guinea pigs taste testers!
I apparently nailed it on the first recipe!
Here are a few of the comments I received.

1. "What is up with these cupcakes. They are
so incredible! Where did you buy them?"

2. "These are to die for.  Where did you buy them?"

3. "This is THE BEST frosting I have
ever tasted!  Where did you get these cupcakes?"

4.  "Seriously, you need to quit your day job
and open up your own Bakery.  These are
THE BEST cupcakes I have ever eaten
and I have eaten my share of cupcakes!"

These are the cupcakes that I took to work.
How did I fool them?

These are my secret ingredients.
Yes, I fooled them by using a box cake mix!
By simply substituting a few of the ingredients
you will end up with a cake, or cupcakes, that
tastes like they just came from the Bakery!

Here is how I made my "Just From The Bakery Cupcakes".

Any box cake mix will do.
I just happened to have this box mix in my pantry.

Open your box mix and pour into a mixing bowl.
According to the box mix directions, add 1 cup of water,
3 eggs and 1/2 cup of oil.

INSTEAD I substituted and added,

1 cup of 2% milk
4 eggs
1 stick melted butter, (salted or unsalted)
1 teaspoon vanilla extract
Don't worry that your batter will be thicker and look like pancake batter.
Pour the batter into your cupcake molds and bake according
to the cake box mix directions.
Remove from oven and let cool completely before frosting.
Word got out quickly at work about my cupcakes.
I happened to look at the desk where I placed
the cupcakes and it was like a feeding frenzy
was going on!

No joking!

I have since had a few people ask if I have
any of "those cupcakes" they can buy from me.

Sorry, they were gone in mere seconds!
24 cupcakes gone (picture me snapping my fingers) just like that! 
Who would have thought that by substituting and
adding a few ingredients would make that big of a difference?

Later I will do a post about "THE MOST INCREDIBLE FROSTING".
You will be surprised how it is made.

Until Next Time,
Veronica

Sunday, August 7, 2016

Sailing Away

I finally get to show you what I made for
our Son and DIL.

YEAH!

First off, let me just say that we are going to be
GRANDPARENTS for the first time!!!!
We've known for awhile but we didn't
want to make any announcements until
we were sure that everything was going
to be o.k.
 Mom, Dad & Baby are all doing well.
Oh, and we know that we are going
to have a GRANDSON!

Our DIL has decided that she would
like to decorate the nursery in a Nautical theme
with the colors, navy, white, teal, and a touch of yellow.
She was looking at Nautical Baby Mobiles
and just couldn't find one she liked, so
she ask if I could come up with something.

Oh the challenges I must endure!

I made a Nautical Baby Mobile and
incorporated the colors she chose for the nursery.

This is our DIL at 25 weeks holding her new Baby Mobile.
She was thrilled with it.
Her comment when she saw it was,
"It is super, super, cute"!
I'm glad she liked it so much.

Here are the close ups.
I created and cut each of the ornaments using my
Silhouette Cameo cutting system.
I wanted each of the ornaments to be sturdy,
so I used thick watercolor paper as the base,
and layered each ornament 3 times.
Each of the ornaments are also decorated on both sides.
I didn't want to leave the top of the mobile
blank, so I created this cute little whale
to float above the ornaments.

Isn't he a cute, happy whale?
The biggest challenge was deciding what to hang the
ornaments from.  I finally came up with the idea of using
a ship's wheel.  I made a 12 inch ship wheel using the
watercolor paper and layering it 4 times.  I originally
was going to paint the ship wheel so that it would
have a wood-like look to it.  I quickly abandoned that
idea as it would be very time consuming and I
wasn't sure I could achieve the look I was going for.
Then I remembered that I had just bought a roll of
contact paper with a wood look to it! You know
the kind that you line kitchen cupboards with?
Could I possibly use that to achieve the look I was going for?
Why yes!
It worked PERFECTLY, knots and all!
Some times I amaze myself!
Next up are the sailboats.
I layered the base with navy, yellow, white and teal cardstock.
Mini ship wheels.  Again, I lined them with the contact paper.
Each one has a different wood-look pattern.
The lighthouses I painted on teal stripes,and added windows
with the glow of lights.
And lastly, how can you not add an anchor to a nautical theme?
I layered navy cardstock and painted on white dots.
To put the mobile together I used clear jewelry 
making wire, basically it's fishing line,
 and ran it through the top and bottom of each ornament.
If I do say so myself, I think it turned out pretty darn cute!
What do you think?
That's it for this week.
Until Next Time,
Veronica