Would you like to make a Farmhouse
clock like mine?

Let's begin.
First, you will need a round wooden circle,
choose your size, and an image of how you would
like your clock to look.
My wooden circle measures 24 inches.
My wooden circle measures 24 inches.

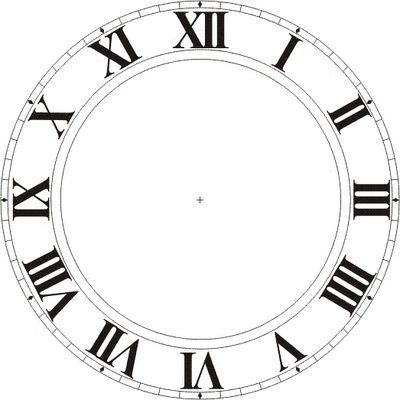
This is the image I used for my layout.
Lightly sand down the top and sides of the disc.
I didn't sand it smooth because I wanted a little
bit of imperfections.
I used my handy, dandy, hand sander to make sanding quicker.
Yes, this sander is all mine.

Wipe off all the dust from sanding.
I applied one coat of this stain to the top and sides.


I knew that I wanted the center of my clock to have the dark
stain showing. I drew a 10 inch circle in the center and then
painted 2 coats of white paint outside the dark circle. I wasn't
worried about getting a little paint inside the center circle.
Let your paint dry completely.

After the paint had dried, I lightly sanded over the whole disc
until I was satisfied with the look.

This is what I use to draw my large circles with.
This tool makes drawing circles a breeze.

Next, I drew 3 more circles to accommodate the
numbers and the second hand lines.
I didn't measure these, I just eyeballed them.
I didn't measure these, I just eyeballed them.
I created my Roman numerals using the Abraham Lincoln font
and sized them to fit my space. I cut each set of numerals out
and placed them onto the disc using the template as a guide.

Once I was satisfied with the placement of the numerals,
I placed a piece of carbon paper behind each set and
traced the numerals using a ball point pen.

Once I had all the numerals traced, I used these to
outline and paint them in.

Figuring out how far I needed to place my second hand lines
took a little bit of math skills. Once I figured it out I used
a piece of string and marked 2 black dots to use for a spacing tool.
I made my mark and moved the string for the next line to be marked.

I decided that I wanted my Farmhouse clock to be purely decorative
for now. I can easily turn it into a working clock later if I change my mind.
To create my clock hands I purchased a piece of Balsa wood
from Michael's which costs $1.29.

machine. I traced the hands onto the Balsa wood using the same
carbon paper method. Once the hands were traced I cut them
out using an Exacto knife and painted them using the paint markers.

coat of this wax to the front and sides of the clock.
I wanted to protect all of my hard work.

to take pictures of how I attached the hands.
Basically, Hubby drilled a center hole for me
and I used a small piece of dowel rod and
glued it into the center hole.
I placed the hands onto the dowel rod with
a washer between the two hands so that I
could easily move the hands to set different times
when the mood strikes me.
To hold the hands onto the dowel rod I
used a thumb tack that I painted using the paint markers
and pushed it down in the center of the dowel rod.
I found this package of hangers in Hubby's garage
and had Hubby attach the hanger on the back
of the clock for me.


Until Next Time,
Veronica
No comments:
Post a Comment