Sunday, May 17, 2015

Herbs

I've made another change in the kitchen.
 
Imagine that, me making changes!
 
Hubby says that I am forever changing things.
 
Isn't that what life is all about?  Change.
 
He likes to have everything stay the same FOREVER!
 
I for one LOVE change.  Plus it gives me a reason to be creative!

Since I created my chalkboard in the kitchen I wanted to lighten things up a bit in the kitchen. But I wasn't quite sure just what I wanted to do, until I noticed my little herb garden on our kitchen window sill.

 
I was getting tired of the dark rooster pictures I had hanging in the kitchen.

 
I had already taken these down and realized I deleted my picture of them hanging on the kitchen wall.  I pulled these out of the closet and snapped a quick picture.  Please ignore my reflection in the pictures.

I replaced my rooster pictures with 3 pictures of my most used herbs.  It's hard to get a good picture in our kitchen because the lighting is not the greatest, but you get the idea.

Parsley

Rosemary
 
and...
Thyme.
 
Here is how I created my herb pictures.
 
I purchased 3 inexpensive frames from Walmart.
 
 
I then took them apart and painted the frame with acrylic paint in Robin's Egg Blue.
 
 
I found 3 herb pictures from Graphic Fairies and printed them onto good cardstock. Place them inside the frame and I was done.
 
Here is a before and after picture.
 
 
And here they are on our kitchen wall, bad lighting and all.
 
 
I'm very happy how these turned out.  The lighting makes these look like they are wrinkled. No wrinkles in these prints!  They truly look like professional prints.  Hubby likes the lighter look also in the kitchen.  I always run my ideas by him but It's hard for him to vision them.  I knew that he would come around once he saw the final results!
 
That's it for this week.
 
Make sure you check in next week.  I have a fun project that the kids can get involved in also.
 
Until next time,
Veronica


Sunday, May 10, 2015

How to Organize and Style a Cork board

I'm the type of person who likes to have
everything neat and orderly with
a sense of style.
 
So when our cork board was getting out of control,
it was time to step in and clean it up!
 
This is how bad our cork board had gotten.
 
 
It was hard to try and find what you were looking for.
There were things hiding underneath of things!
It was a MESS!
 
Let's get organized!
 
First, remove everything from your cork board and sort it out.
You want to start with a clean slate.


I purchased some burlap with a design on it to give our cork board a little style.
 
 
Measure your cork board.  Our cork board is 17" x  23".
If you plan on using material, cut your material 4" wider and longer than your cork board.
I cut ours 21" x 27".
Working on a smooth surface,  lay your material right side down with your
corkboard facing down and centered onto your material. Sorry I forgot to take a picture of this.
 
Wrap your material around the backside of the cork board and staple into place using a staple
gun, making sure to pull your material tight as you go.  Work the top, bottom, and side first before
working the corners.  Once you have the 4 sides completely stapled into place, grab a corner
and pull down tight toward the center and staple into place.
 
 
Flip it over and your ready to get organized.
 
I purchased a few chalkboard label from Hobby Lobby to organize mine.
 
 
In order to hang them on the cork board, I added a thumb tack to the clothespin
using my hot glue gun.
 
 
I found this container to use also.
 
 
This is what our new styled and organized cork board looks like now.
 
 
So Much Better!
 
That's it for this week.
 
Until Next Time,
Veronica


Sunday, May 3, 2015

All About H.O.M.E.

Today's post is all about home. 
 
Last week I promised that I would show you how I made my HOME letters that I placed beside my chalkboard.


But before I do, I wanted to share what Hubby has been up to.  Our shrubs in the front of our house were starting to look a little sparse and scraggly.  It was time to replace them.  This is a picture that was taken in the Fall.
 
 
Yesterday Hubby dug out the old shrubs, the ones under the window, and replaced them with 4 Boxwood shrub, and also put down new mulch around the entire house.  Our curb appeal is so much better now.  These Boxwood will fill in the area under the window nicely.
 
 
Everything is starting to green up and bloom around here.  This is our Magnolia tree in our backyard.
 
 
We got our first Hummingbird this morning!  It's always good to see them.  It means warmer weather!  It's 4:00p.m. and is 81 degrees and breezy here today.  We have all of our doors and windows open and sat and drank our morning cup of coffee on the back porch!  Life is good!
 
 
Let's get back to how I made my HOME letters.  I knew that I wanted to have the word HOME beside my chalkboard.  I thought that I would purchase some unfinished wood letters that I could paint and hang.  I looked at a couple of different craft stores and just could not find what I wanted.  I was looking for something with a little depth to it.  All of the wooden letters that I could find were only about 1/4 inch thick and either too small or too big.  Not what I was looking for.  Then I found these at Hobby Lobby which were the perfect size!  They measure 8 1/4" L x 5 1/4" W x 1" D, are very lightweight and don't need nails to hang them.  Cardboard letters!  I got each letter on sale for $1.49!  Regular price is $2.99 each.  Gotta love a sale!
 
 
I dug out my craft chalkboard paint and got to work painting them.  It only took me 1/2 hour to paint all 4 letters.
 
After they were dry, which only took a couple of minutes, I was ready to hang them.  I used this to hang them.  Tacky Putty.  This is strong enough to hold these letters, will not damage your paint, leave any kind of residue on your walls, plus you don't need nails to hang them.  Hubby liked the idea about no more nail holes in the wall!
 
 
Simply break a piece off and push onto the back of the letters in various places.
 
 
Place onto your wall, adding a little pressure to secure into place.
 
 
I didn't even do any measurements to hang these.  I just eyeballed them and made adjustments as needed.  That's the good thing about this Tacky Putty.  You can make adjustments very easily and quickly.  Simply remove from the wall and reposition as needed.  No extra putty required.  This project cost me under $10.00 to make!  No one will ever know that these letters aren't made from wood!  This was a very quick, simple and inexpensive home décor project that adds a casual touch of style.
 
 
That's it for this week.  I'm off to work on my next project.
 
Until Next Time,
Veronica


Sunday, April 26, 2015

Changes in the Kitchen & a Party

This past week we were on vacation... well sort of.
It's was supposed to be one of those relaxing, fun vacations.
 
Hubby was supposed to go on a fishing trip and I was going to stay home
and work on some home projects.
 
Well it didn't turn out that way.
 
Hubby was having  foot problems from an old injury which prevented him from going on his trip.  So we ended up staying home and doing a few changes around the house.
 
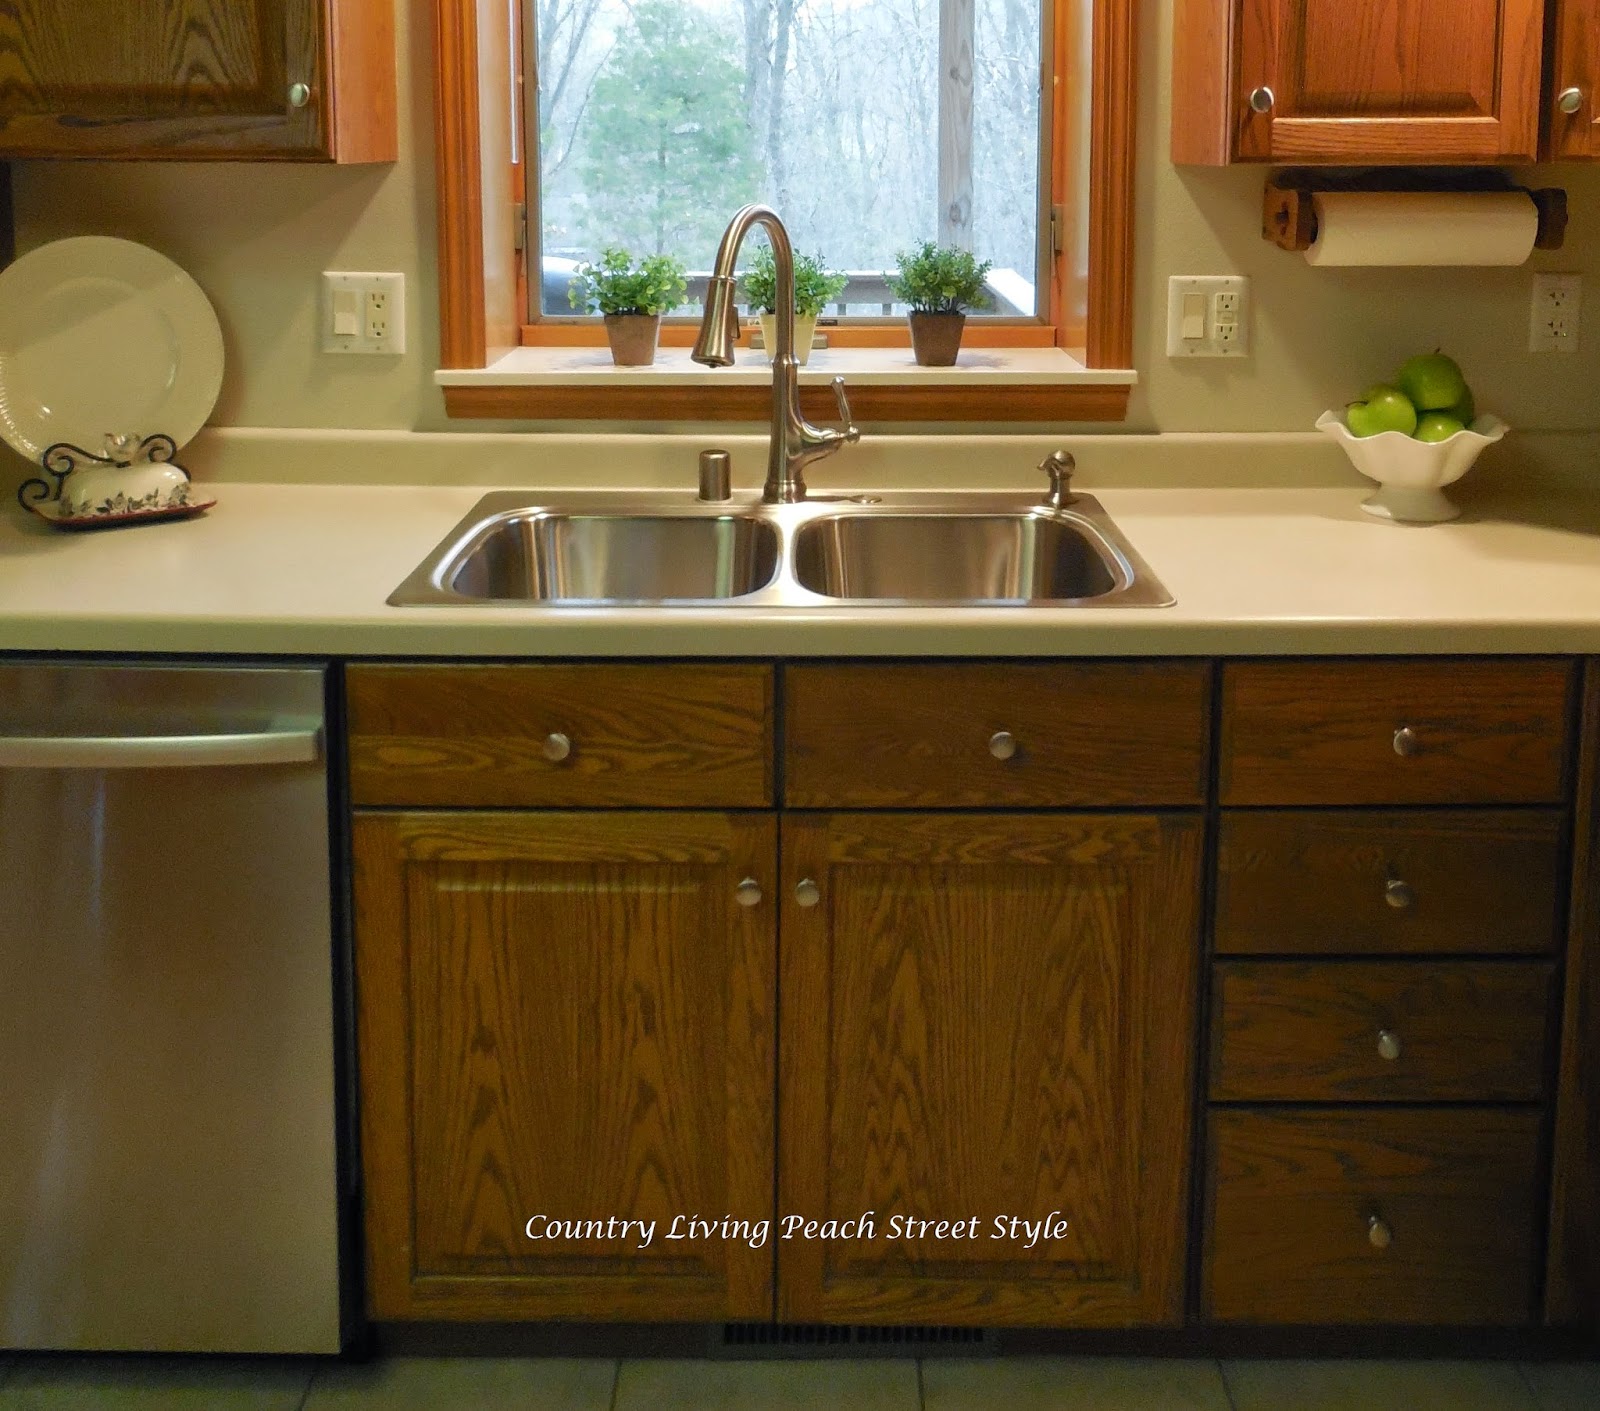
One of those changes was to install a new stainless steel sink.  We are slowly switching out our old appliances with stainless steel ones as our budget allows.  We had an old white cast iron sink that was way past its' prime. We removed the old sink, which by the way, those sinks weigh a TON.
 
 
And installed a new Kohler 9 inch deep Stainless Steel Sink with a new
Glacier Bay Touchless faucet and soap dispenser.
 
 
This faucet is so cool!  It has a light in it!
 
 
This will come in handy for nighttime use!
 
Here is a wider picture of our beautiful sink area.
 
 
Hubby did a fantastic job!  I love my new sink and faucet!
 
The other change was the wall where I have my new chalkboard.
The wall looked a little bare on each side of the chalkboard.
 
 
So I created a few letters to hang on one side,
hung a few plates on the other side,
and swapped out a few items.
Now it looks finished.
 

 Yesterday we spent the day with our Son and DIL.  They just bought their first
home and had a house warming / birthday party.
 
 
They had a nice turn out.  Lots of family and friends stopped by.
 
 
Their house was bursting at the seams with people. 
The kitchen and dining room had too many people in it for me
to get a good picture.  Here is their living room.  It's HUGE!
 
 
It's too bad the weather wasn't warmer so we could have enjoyed their deck.
Although, we did go out here and eat corn on the cob.
Everyone who came brought a different dish to pass.
There was so much food that they will be able to eat on it for 2 weeks!
 
 
Here is the Birthday card I made for our DIL.


It is 7:40p.m. here and this is what is in our front yard.
 
 
That's it for this week.
 
Next week I will show you how I created my letters in the kitchen
and how to hang them.  It's another quick and easy project.
 
Until next time,
Veronica


Sunday, April 19, 2015

DIY Linen & Room Sprays

During the winter months our homes tend to get a stale, closed in smell.
I love to burn or melt candles to freshen the air.
I only burn soy candles because they burn cleaner with no soot.  Unfortunately, when I use these my allergies and asthma start to act up after a while.  I've tried numerous scents and brands with no luck.
I don't care for aerosol sprays because they are either so strong smelling or just plain artificial smelling.
 
So what's a girl to do when she loves to have her home smelling fresh and clean?
 
Why she makes her own all natural linen and room sprays by using 3 simple ingredients!
 
And the best part......It doesn't bother my allergies or asthma!  EVER!  No matter how much I use.
 
That's right, 3 simple ingredients.
 
Vodka, water, essential oil.
 
 
The vodka is essential for the spray.  Oil and water don't mix, by adding a little alcohol it helps the oil disperse and also helps the scent linger longer in the air.


This spray is safe enough to spray on linens.  I love to give our pillows and sheets a few spritz before bedtime.  Try using a mixture of Lavender and Vanilla for their calming effects.  Such a pretty smell.
 
My bottles are 8 ounces.  The following recipe will yield a 2 ounce bottle.
 
Linen & Room Spray
 
1 Tablespoon Vodka - any brand
1/4 cup Filtered Water (I use our filtered water from our refrigerator)
10-40 drops of Essential Oil of choice
 
Place the vodka into a small spray bottle.  Add the desired drops of essential oils and shake well to mix the two together.  Add the water.  Label your bottle and you're ready to use your homemade linen & room spray.  Shake before each use to distribute the essential oils.
 
 
Give this linen and room spray a try.  I'm sure you will be pleasantly surprised.  No artificial smells or unwanted chemicals being released into the air.  This smells so much better than the aerosol brands, plus you get to control the scent level.
 
I love the smell of fresh air, it's so invigorating.  I love being able to have the windows open with the fresh air blowing through.  When that's just not possible I pull out my bottles of homemade sprays.  I usually keep a bottle of this in each of our bathrooms year round for those just-in-case moments.
 
Yesterday it finally reached 70 degrees here.  We put all the screens in our doors and windows and also set the back porch up. It's so nice to be able to open our doors and windows to let in the clean fresh air and enjoy a cup of morning coffee on the back porch.

That's it for this week.  Enjoy your week!

Until next time,
Veronica

Sunday, April 12, 2015

Homemade Cough Syrup & April Chalkboard

Can you believe that it is April already!
 
I love when Spring arrives and all the summer birds return
and the Spring flowers start to peek out of the ground.
 
I love to wake up and hear the birds chirping, it's a sure sign of Spring.
 
We've had a lot of rain here lately which helps the flowers and grass start to grow.
Our daffodils are already starting to open.
 
 
One thing I don't care about Spring is that it brings on my allergies!
This year has hit me pretty hard.  I'm talking knock me off my feet hard!
I do take prescription allergy medicines year round but even those weren't enough to keep the allergies from creeping up on me.  This year I developed a bad cough because of all the sinus drainage down the back of my throat, preventing me from getting a good nights sleep.
 
So I thought that I would share my recipe for Homemade Cough Syrup.
 
This stuff WORKS people!  Plus it doesn't make you feel lethargic.
 
*DO NOT GIVE TO CHILDREN UNDER ONE YEAR OF AGE*
Their little digestive systems cannot break down the enzymes in honey and can cause botulism.
 
All you need are 3 simple All Natural Ingredients.


Raw Honey - make sure the label states RAW.  You want all of those good for you enzymes and probiotics that you only get with raw honey.  You should be able to get this at your local grocery store.  It isn't any more expensive than the processed honeys.
 
Extra Virgin Olive Oil - for it's natural anti-inflammatory
 
Lemon Juice which is a natural antiseptic.  I didn't have a lemon for the photo thus the lemon juice bottle.
 
All Natural Cough Syrup
 
3/4 cup Raw Honey
1/4 cup Extra Virgin Olive Oil
2-4 Tablespoons Lemon Juice
 
Mix all ingredients together and give it a good stir.  Store in an airtight container.  I use the honey jar.
 
Dosages:
 
Children 1 year and older - 1 teaspoon as needed for cough
Adults - 2 teaspoons as needed for cough
 
 
I take 2 teaspoons of cough syrup before I go to bed at night and am able to sleep all night without coughing!
 
Hubby had a bug a couple of weeks ago and used this cough syrup.  He only had to take one dose in the morning and one dose at night.  That's it!
 
As promised I have my April chalkboard completed.  I worked on it a little each morning before I headed off to work.  I wasn't sure if I would get it done because my allergies stopped me cold for a few days.  This morning was the first day I actually started to feel better so I was able to finish it up.
 
Here is my April chalkboard.  I thought I would use colored chalks this time around.
 
 
I should have added at the end...and allergies!
 
I wanted to give the kitchen a lighter look for Spring.  Here is how I set up the little
stand and area that sits under my chalkboard.


This is the whole SHABANG!


I hear that we are supposed to have temps. in the 70s this week.  I'm so ready for nice weather!
That's it for this week.  Hope you have a beautiful week.
 
Until Next Time,
Veronica


Sunday, April 5, 2015

Happy Easter and a DIY

Happy Easter Everyone!
 
Yesterday we spent time with our Son & DIL.
They just purchased their first home and moved in.
We are so excited for them!
 
 Today we are enjoying a quiet day.

I'm glad that I was finally able to complete this next project last weekend.
I've been wanting to make this project for some time but
wasn't able to find what I wanted until two weeks ago.
I happened to stop in at our local thrift store and spotted this in the back of the store.
So I grabbed it and brought it home.
It's 27 inches x 39 inches.
It's BIG!  It's exactly what I was looking for.
 I finally had everything I needed.
 
 
Hubby saw it sitting in our laundry room and shook his head
and said, "I can't even imagine what you are going to do with that".
 
I wiped the whole picture down with a damp rag to remove any dust and dirt.
 
I took the picture completely apart and painted the frame with white paint.
By taking the picture apart I didn't have to tape anything off.
So much easier and faster to paint with no worries about
getting paint on unwanted areas.


Next I grabbed my chalkboard paint and painted 2 coats right over
the picture using a foam roller.


Once the paint was dry I assembled it back together.
 
By now you probably have guessed what I made.
 
It's a Chalkboard!
 
 
Before you can write on your new chalkboard you have to cure it.
This makes erasing your images easier and prevents it from
leaving behind any permanent images.
 
To cure your chalkboard simply rub chalk all over the
board, completely covering it.
 
 
Using a rag, or eraser, erase the chalk from the board.
No waiting time required.
 
Your chalkboard is now ready to use!
 
 
I LOVE my new chalkboard.
 
This is what I drew on it for Easter.
 
 
I love that I can change this by simply erasing and drawing
a new design whenever the mood strikes me!
 
I have this hanging in my kitchen.
I drew the image on it while Hubby was sleeping.
When he woke up and walked in the kitchen he noticed it right away.
He likes my new chalkboard and thinks it is a neat idea.
Just think of all the "To Do Lists" I can leave for Hubby!
Just kidding, sort of.
 
Check back in next week I'm hoping to change my design to welcome
in Spring.
 
 
See you next time,
Veronica