Sunday, March 25, 2018

How To Transform A Timeworn Dresser

Don't you love seeing a good Before and After?
Oh good, me too.
*I am in no way compensated for any of the products I show.
These are my go to products that I use time and time again
which do exactly as they claim.*

Once Hubby and I got this piece home
I couldn't wait to start transforming this
dresser and bringing it back to life.
The first thing I did was sand down the top.
I  almost got to the point of throwing in the towel
because the stain/paint/varnish was so thick it took
FOREVER to sand off a small section, but
 once I got my first glimpse of the beautiful natural wood
color under all that nastiness that's all the encouragement
I needed to keep going. I'm so glad I didn't give up.
After seeing how beautiful the wood tone
was I decided not to stain or paint the top.

I wanted to show it's natural beauty off.
I added a coat of Minwax Paste Finishing Wax to protect the top.
Love this stuff.
Next, I removed the knobs and keyhole covers and wiped
down the entire dresser using Clorox wipes to remove
all of the dirt and grime.
Using wood putty I filled in any deep scratches, dents, holes and cracks.
This is the wood putty I use. It goes on pink and dries a light beige color.
Once the wood putty was dry I sanded down
the areas until I had a smooth finish.
Using a shop vac with a brush attachment I vacuumed
the dresser down to remove all the fine dust from sanding.

Now I was ready to paint.
I painted the dresser using 3 light coats of leftover Farmhouse white chalk paint.
I let each layer dry completely before applying the next.
When using chalk paint there is no need to prime your piece.
This is the 2nd drawer that had the big crack in it.
You can't even tell it was cracked.

I let the paint dry overnight then sealed the body of the dresser
using Annie Sloan Clear Wax.
It was time to add my new knobs.
Aren't these knobs just perfect for this dresser?
The best place I found for unique knobs is Hobby Lobby.
They have a huge selections to choose from and I
always wait until they have a 50% off sale.
These knobs costs me $2.99 each.
After much searching I was able to find keyhole covers
on an Ebay store that were the same size as the old ones
but they only came in a gold finish.
I wasn't too concerned about that. I had an easy remedy to fix it.
Rub and Buff to the rescue. I used the Silver Leaf color.
You can find this in any craft store.
Simpy rub it on and let it dry, then buff to obtain a shiny finish.
Just look at that beautiful dresser top!
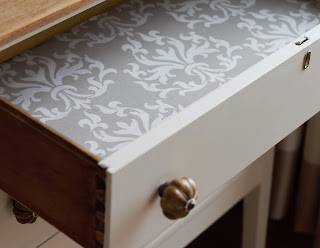
Are you ready to see the surprise inside the drawers?
I lined each of the drawers with some leftover material from my stash.
It adds a little special touch to this dresser.
Before adding the material I wanted to make sure that the stain
marks didn't show through the material.
I applied a coat of primer over all the stains.
This is my favorite primer.
After the primer had dried I applied a coat of Mod Podge using
a foam brush and then laid down my fabric and smoothed it out.
What a nice surprise now when you open the drawers.
This dresser now sits in our dining room and holds
all of our table linens.
It's finally nice to have one designated area
to keep all of these corralled.
With a little sweat equity and a big imagination
I was able to turn this old worn out dresser into
a thing of  beauty with a new purpose. I'm so happy
that our Son and DIL didn't donate this dresser.
This dresser cost me $25.00 to restore only because
I bought new knobs and keyhole covers.
Where else can you find a beautiful dresser
for that price? I'd say I got one heck of a deal! 

I wander what our Son will think of this dresser now?

Check back in next week as I have a new
Masterpiece to show off.

That's it for this week.

Until Next Time,
Veronica


Sunday, March 18, 2018

An Old Beauty

Last week I mentioned that we are expecting
twin grand babies in the near future and that
I inherited this old dresser from our Son and DIL.
Our Son and DIL are in the process of preparing a room
for the new arrivals and have been sorting, throwing
and donating items. One of the items that was going
to be donated to Goodwill was this old dresser.
Luckily, before our Son hauled it off to Goodwill
our DIL thought of me and how I like to restore old things
and bring them back to life. Our Son called and ask if I would
like to look at this dresser before they hauled it off to Goodwill.
He mentioned that it was in pretty rough shape.
As soon as I saw this dresser
I knew it was coming home with me.
It is an antique and is made of solid wood.
Even the drawer slides are made of wood,
and all of the drawers are dove tailed.
It has all of the original wood wheels which are in great shape.
But before I show you the after let me show you
how bad this dresser actually looked up close and personal.
It looked like whoever finished this dresser
combined paint, stain and varnish together and slapped it on,
THICKLY.
There was white paint spattered or wiped all over it.
The top was scratched and nicked.
I don't know if this dresser had a mirror attached or it
simply had a back piece missing.
The middle drawer had a big crack in it
and the bottom drawer had a big deep scratch
(which I forgot to take a picture of).
One of the drawers was missing a keyhole cover.
The keyhole covers were thick with grim
and the inside of the drawers had big stain marks.
Hubby just wasn't feeling it, but me, I could
see beyond all of the grim, cracks,
dents, scratches and nicks.
I could see the potential in this beauty.

So, are you ready to see the after?

Oh, if you're someone who doesn't like to
see antiques touched in any way you might
not want to look at the after.

O.k., you've been warned.
Here goes!

Before
and After.
We LOVE it's new look!
Hubby was amazed at the transformation of this beauty.
You would never know by looking at it that it used to
be an old worn out dresser that had seen better days.
Here is a side by side comparison.
Check back next week and I will show you
some close ups of this beauty and talk about
how I transformed this piece with a special
surprise inside.

Until Next Time,
Veronica


Sunday, March 11, 2018

A New Life

Goodness gracious it's been awhile since
I last wrote a post, not that I didn't want to mind you,
it's just that we have had a lot happening around here lately.
Let me try and catch you up with life in our house.

First off, I finally decided to pull the plug and retire!
Me, being retired.
I still can't seem to wrap my head around that idea.
My paperwork process has begun and let me tell
you what a process it has been so far.
Let's just say it's easier to get hired than
it is to retire from my place of employment.
It deserves it own post!

Once I decided on a date to retire, I also
made the decision to work as much overtime as possible.
I wanted to earn a few extra $$ so I could buy some
STUFF without cutting into the household budget.
Working 6 days a week, sometimes 9 days in a row, doesn't
leave you much time for anything else,
hence the lack of blog posts.

I've also started working a different
shift before I retire and am trying to adjust to the
new work hours.

And in more exciting news,
and this is BIG, no, HUGE news.
 We are having TWINS!
Well, not Hubby and I of course,
our Son and DIL are.
This news not only left us speechless and walking around
in a daze for a few days but everyone else as well.
We knew that they had been trying for a while to have another baby.
They knew that they were pregnant but didn't want to let the cat out of the bag
until it was officially confirmed, never imagining it was twins.
Imagine their shock when they found out!
So..........
after I retire I will have a few months to play
before I start a more important job, and a new life,
as a Nanny Granny to our grand babies.
It doesn't seem like much, but it sure
has changed our life, all in a good way.

Now that you are all caught up as to what has been
happening around here I thought I'd show you
something that I inherited from our Son that is
getting a new life as well.
Check back in next week and I'll reveal how I gave
this old dresser a new look and life.

Until Next Time,
Veronica

Sunday, January 21, 2018

Renewing Grout

We have a few rooms in our home that have tiled floors.
I just realized that I never posted about
how I updated our dirty, grimy, yucky looking grout
and completely transformed the look of our floors.
No matter how much I scrubbed that grout it just wasn't coming clean.
I don't believe that the grout was ever sealed on any of our tiled floors.
Here is a before picture of the 
tiled floor in our downstairs bathroom.
I had just got done mopping this floor.
See how bad the grout was?
After I performed my magic this is what it looks like now.
We couldn't believe the difference it made with this floor.
 It looked like a newly tiled floor.
After we saw what a difference updating this floor made
I couldn't help but update all the tiled floors in the house.
So, for 1 month, every weekend, I sat on my butt and
painted all of the grout on our floors.
2 full baths✔
half bath✔
laundry room✔
kitchen✔
foyer✔
Here is a list of supplies and how I did it.

Grout Renew - less than $8.00 per bottle
small artist paint brush
small plastic container to hold the paint
wet rag
bucket of warm water to rinse the rag out

I picked up this GroutRenew from Home Depot in the flooring section.
It comes in a few different colors.
This GroutRenew is stain and fade resistant and is so easy to use.
Simply pour in a container, no mixing required, and start painting.
I used an artist paint brush, working on a small area at a time,
I started applying the paint.
I painted one line at a time and then immediately wiped off the excess.
You can see the results immediately and the paint was dry within 15 minutes
of painting. Although, the instruction recommend not walking on the newly
painted floor for 24 hours.
It was a time consuming project but so worth it to achieve the end result.
Beautifully tiled floors with clean grout.
This tiled floor is in our foyer and half bath.
We walk on our tiled floors numerous times a day
and they still look just as good as the first day I painted them.
They wash up so easy. No special products are needed to keep them clean.
I use a mixture of white vinegar and water, that's it.
I never use soap.
I don't want a filmy residue left behind.
I bought 2 different shades and updated 6 areas in our home
for around $16.00 and still have over half bottle of each shade.

For just a few dollars and a little sweat equity,
this is a very inexpensive project that will
keep your home looking beautiful.

Not bad if I do say so myself.

That's it for this week.
Until Next Time,
Veronica

Sunday, January 14, 2018

My Last Working Christmas

I just celebrated my last working Christmas from my real job.
The one that pays the bills, not my Blog job.
Next year I will be RETIRING before Christmas.

My goodness, where have the years gone?
At times, the day to day routine seemed to drag
and I never thought that I would get to this stage
in my life, yet here we are 30 years later.
It seems so surreal.

Each year at Christmas time all the employees
get together and we create a feast that is unbelievable.
There is such an abundance and variety of food to feast on it's
like going to one of the buffets in Las Vegas!

This year my contribution was Hot Reuben Dip.
If you love Reuben sandwiches, you're going to love this dip.

It's a perfect dip to place in a slow cooker and cart off to work.
(I tripled the recipe)
No one at work had ever heard of Hot Reuben Dip.
It was a BIG hit.
How could it not be!
It has all the makings of a Reuben sandwich.
My co-worker actually made a sandwich with it.
It's a good thing I saved a bowl full for my photo shoot.
I ended up bringing home an empty slow cooker.😋
You'll want to add this dip recipe to your recipe box.

HOT REUBEN DIP

1 (8 oz.) package Cream Cheese, softened
8 ounces deli Corned Beef, coarsely chopped
1 cup shredded Swiss cheese
1/2 cup Sauerkraut, drained well
1/4 cup Sour Cream
1/4 cup Thousand Island salad dressing
Triscuit crackers or Garlic flavored Rye Chips

INSTRUCTIONS

In a large bowl, combine the cream cheese, sour cream and Thousand Island dressing together until well blended. Add the chopped corned beef, sauerkraut and Swiss cheese, stir until combined.

Place into a slow cooker, or crockpot. Heat on HIGH for 2 to 3 hours or LOW for 4 to 6 hours.

Serve with crackers or chips.

ENJOY!

Until Next Time,
Veronica

Sunday, January 7, 2018

Chasing The Chill Away

How are the temperatures where you live?
We have been having a real cold snap here
with temps in the low teens to single digits
during the day, and night time temps around -11°.

I don't know about you, but I'm sure tired of
this cold weather already. I hate to even walk
outside to get the mail. It's so hard to get warm
even after being out in that cold for just a few minutes.
One way that I like to chase the cold away is with a hot drink.
I named this drink my
SNOWMAN HOT TUB.
I usually have a batch of Homemade Peppermint Hot Chocolate
mix in our pantry ready and waiting for these cold winter days.

Just heat up a cup of milk and add the
Peppermint Hot Chocolate mix.
Pour into a mug and add a special touch
 with a snowman topper.
Adults and kids alike will love this.
Not only will you be chasing the chill away
and adding a smile to their faces,
you will also be creating special memories.

To create the snowman you will need:
marshmallows,
pretzel sticks,
candy corn (our grocery store sells this year round),
and a tube of
Dec A Cake Black Writing Gel

To hold the snowman together I used a pretzel
stick in the top and bottom of one marshmallow
then added a marshmallow on the top and bottom
and squeezed them together.
Add the nose, arms and legs.
Create the face and buttons.

Add your snowman to your cup of hot cocoa.
As he is basking in his hot tub he will start
to melt away and chase your cold chills away.
He is completely edible.
PEPPERMINT HOT CHOCOLATE MIX

6 ounces Candy Canes, finely crushed
2+1/2 cups Dry Powdered Milk
1 cup Hershey's Special Dark Cocoa Powder
1+1/2 cups Confectioners' Sugar
1 Tablespoon Cornstarch

Mix together all ingredients and pour into a Mason Jar with lid.

To make Hot Chocolate: Combine 1/3 cup mix with 1 cup hot milk.

Stay Warm,
Until Next Time,
Veronica


Sunday, December 24, 2017